


ROOM SUITABILITY
Bedroom
Dining Room
Living Room
Hallway
Conservatory
Kitchen
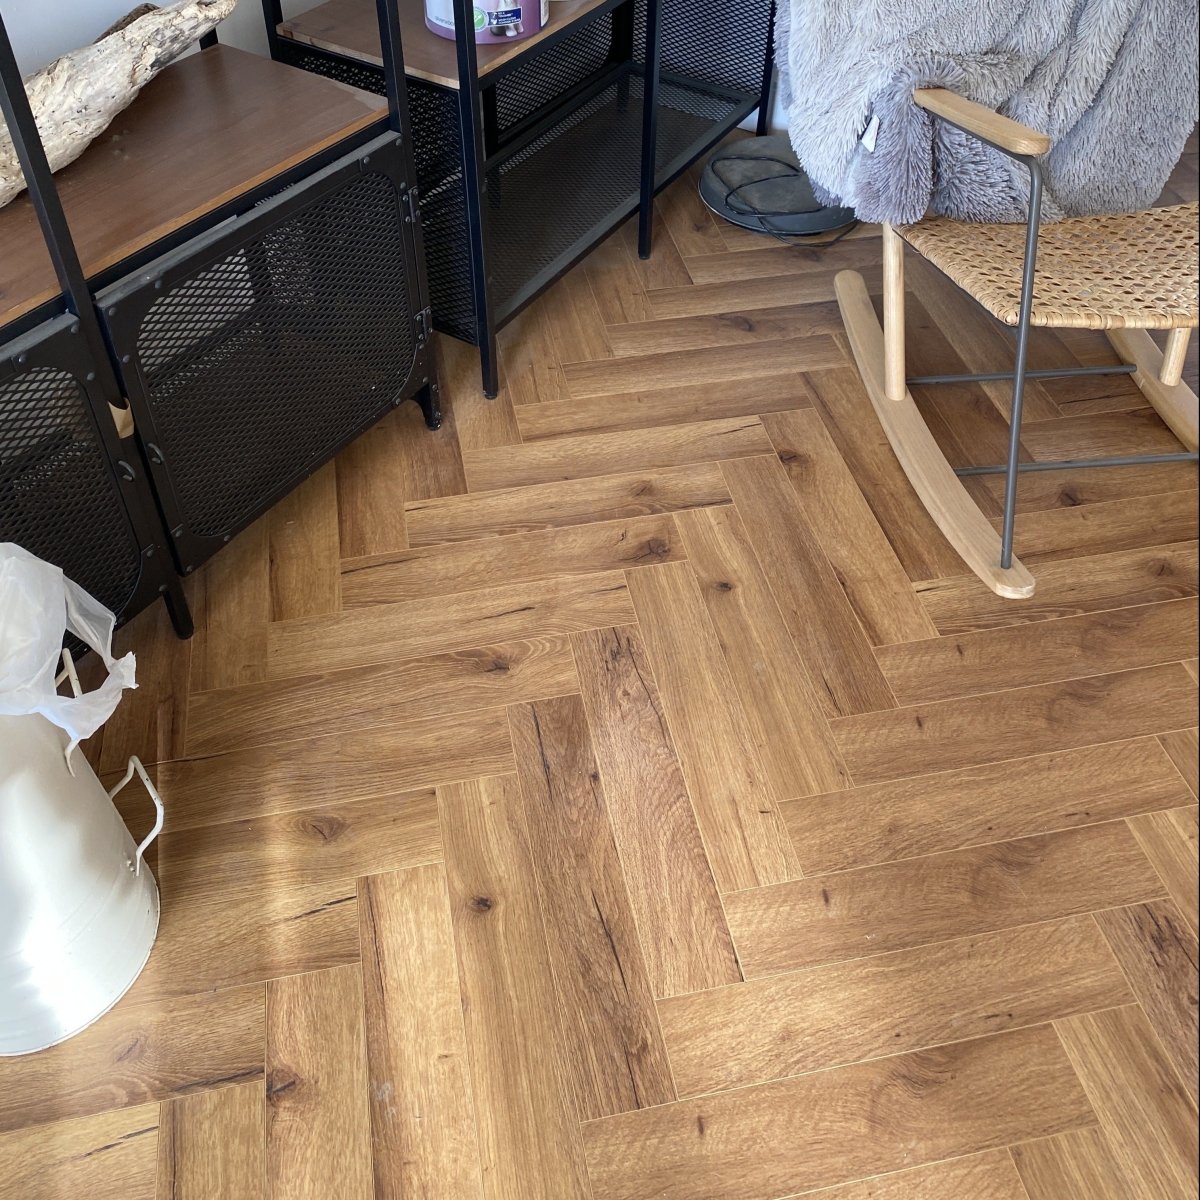
The Konig Prestige Fumed Oak Herringbone laminate flooring combines the timeless elegance of parquet flooring with the durability and practicality of modern laminate flooring. Featuring deep smoked oak tones and a realistic embossed texture, this herringbone laminate flooring creates a bold and sophisticated look that suits both contemporary and traditional interiors. The AC5 rating makes this laminate wood flooring ideal for busy homes and light commercial spaces, while the click installation system ensures quick and secure fitting.
Designed to replicate the authentic appearance of real oak parquet flooring, this durable laminate herringbone floor is suitable for kitchens, living rooms, hallways and open plan spaces. Compatible with underfloor heating, the Konig Prestige Fumed Oak Herringbone offers a stylish, low maintenance flooring solution built for everyday living.
Key Features:
- Premium laminate herringbone flooring
- Deep smoked oak parquet effect finish
- AC5 laminate rating
- Suitable for heavy domestic and light commercial use
- Realistic EIR embossed texture
- Click and tap installation system
- 4 sided V-groove design
- Suitable for underfloor heating
- Scratch resistant laminate flooring
- 20 year residential warranty
Specifications:
- Length: 470mm
- Width: 95mm
- Thickness: 12mm
- Box Size: 1.6074m²
- Installation Method: Click and Tap
- Underfloor Heating: Compatible
- Finish: EIR (Embossed in Register)
Your flooring will be delivered via courier in secure packaging. Deliveries take place Monday–Friday between 8:00am and 6:00pm, and a signature will be required.
Order before 12pm and we offer next working day delivery.
All deliveries are kerbside. You can select a delivery date at checkout, up to four months in advance.
Need to return something? Return anytime within 30 days.
Items must be returned in resellable condition with original packaging unopened.
Before dispatch: Contact us for a full refund within 14 days.
In transit: We’ll work with the courier to stop it and refund minus delivery costs.
After delivery: You have 30 days from delivery to return items.
Konig Prestige Oak Robust Fumed Herringbone (Laminate Flooring)
Underfloor Heating Compatible: Yes
20 Year Domestic Guarantee
Pet Friendly
Easy to Clean
MORE COLOURS IN THIS RANGE


Free samples
See your free samples in your space!
PROJECT DETAILS
Your wastage is: 0.00y²
SUMMARY
Quantity (yd²) — 1.92yd²/pack, €0/yd²:
Will cover: 0.00m²
€0.00/yd² · €0.00/pack · 1 pack
ROOM SUITABILITY
Bedroom
Dining Room
Living Room
Hallway
Conservatory
Kitchen
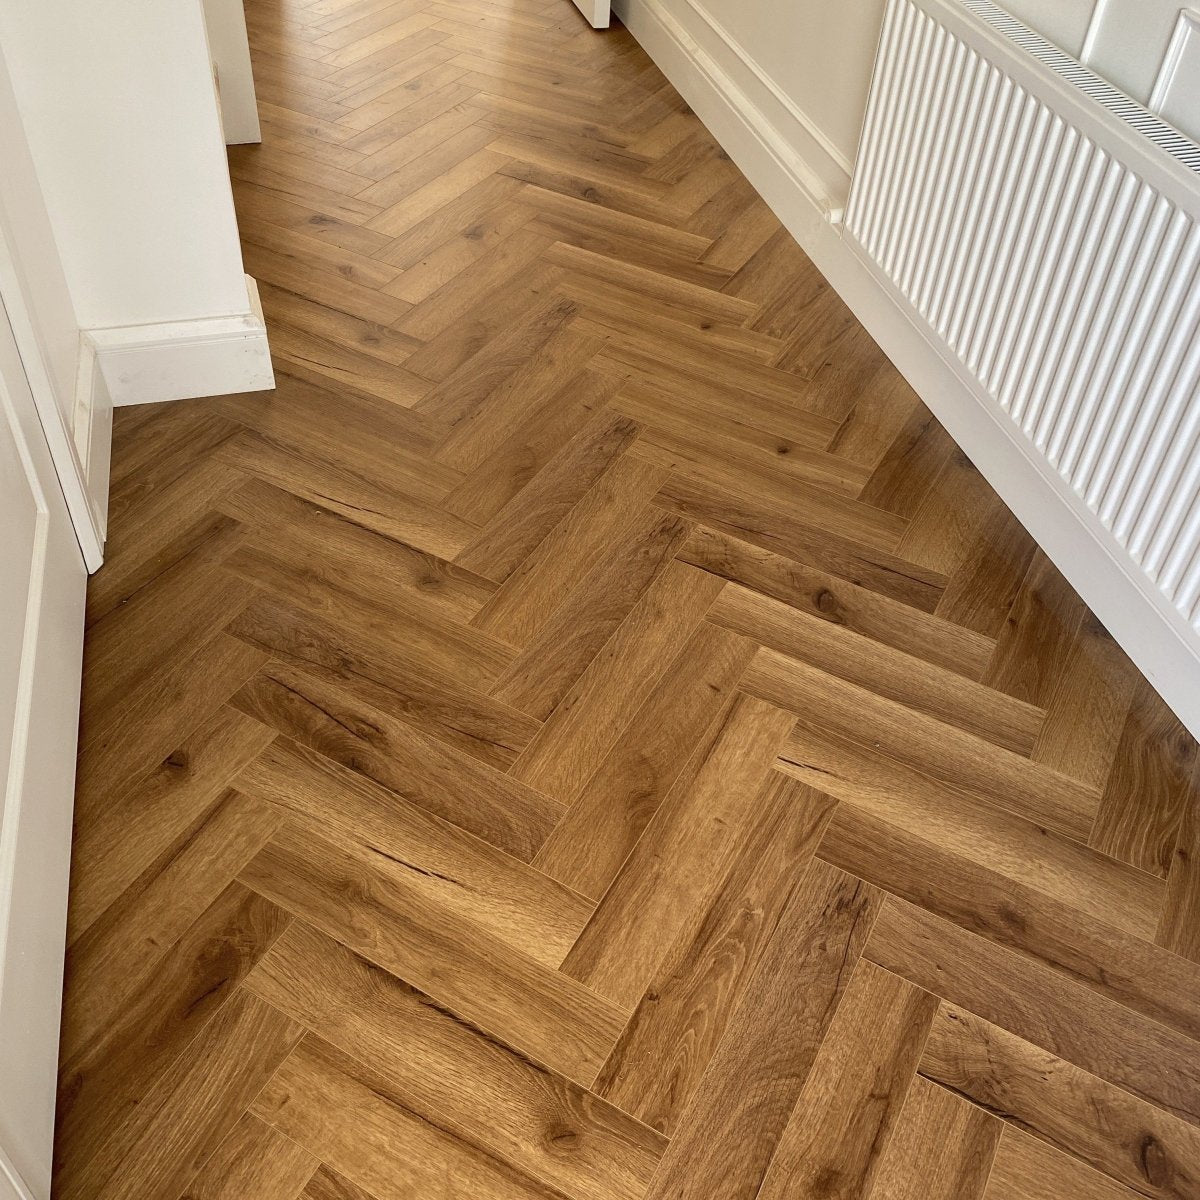
The Konig Prestige Fumed Oak Herringbone laminate flooring combines the timeless elegance of parquet flooring with the durability and practicality of modern laminate flooring. Featuring deep smoked oak tones and a realistic embossed texture, this herringbone laminate flooring creates a bold and sophisticated look that suits both contemporary and traditional interiors. The AC5 rating makes this laminate wood flooring ideal for busy homes and light commercial spaces, while the click installation system ensures quick and secure fitting.
Designed to replicate the authentic appearance of real oak parquet flooring, this durable laminate herringbone floor is suitable for kitchens, living rooms, hallways and open plan spaces. Compatible with underfloor heating, the Konig Prestige Fumed Oak Herringbone offers a stylish, low maintenance flooring solution built for everyday living.
Key Features:
- Premium laminate herringbone flooring
- Deep smoked oak parquet effect finish
- AC5 laminate rating
- Suitable for heavy domestic and light commercial use
- Realistic EIR embossed texture
- Click and tap installation system
- 4 sided V-groove design
- Suitable for underfloor heating
- Scratch resistant laminate flooring
- 20 year residential warranty
Specifications:
- Length: 470mm
- Width: 95mm
- Thickness: 12mm
- Box Size: 1.6074m²
- Installation Method: Click and Tap
- Underfloor Heating: Compatible
- Finish: EIR (Embossed in Register)
Your flooring will be delivered via courier in secure packaging. Deliveries take place Monday–Friday between 8:00am and 6:00pm, and a signature will be required.
Order before 12pm and we offer next working day delivery.
All deliveries are kerbside. You can select a delivery date at checkout, up to four months in advance.
Need to return something? Return anytime within 30 days.
Items must be returned in resellable condition with original packaging unopened.
Before dispatch: Contact us for a full refund within 14 days.
In transit: We’ll work with the courier to stop it and refund minus delivery costs.
After delivery: You have 30 days from delivery to return items.


6 Months Free storage
We know how stressful it can be whether you’re moving in to a new home, renovating or building from scratch.
Product Specification
OUR FLOORS IN USE
REAL HOMES, REAL PROJECTS


Diy-friendly click
Our floors are click and tap products suitable for all DIY installations. These systems are durable, and long-lasting!

real wood texture
Designed with everyday living in mind, our laminate floors are made to go the distance and stand up to daily wear.
Is this your
perfect fit?
Feature | Laminate | Engineered | SPC |
|---|---|---|---|
| Durability | |||
| Water Resistance | |||
| Authentic Look | |||
| Installation Ease | |||
| Underfloor Heating | ✓ | ✓ | ✓ |
| Refinishing | ✕ | ✓ | ✕ |
| Price Range | € | €€ | € |
| Lifespan | 20-25 years | 10-20 years - dependent on usage | 20-25 years |
| Best For | Budget-friendly, high traffic areas | Real-wood feel, living areas | Bathrooms, kitchens, wet areas |
Laminate
Engineered
SPC
Swipe to compare.

Laminate flooring
Laminate flooring Ireland is one of the most popular choices for homeowners looking for a durable and affordable wood effect floor. At Wood Floor Store, our laminate flooring range includes AC4 and AC5 rated options designed to handle busy homes and high traffic areas across Dublin and throughout Ireland.
Built for everyday living, laminate floors are scratch resistant, easy to clean and simple to install with a click system. They are ideal for living rooms, hallways and bedrooms, offering the look of real wood with low maintenance.
With a wide range of colours and styles available, our laminate flooring delivers quality, value and fast nationwide delivery with quick turnaround times.